This utility lets you synchronize two folders. From the Windows Explorer, select a folder and from the context menu choose the "Synchronize..." command. The following window will be showed:

From Folder 2 field, specify the other folder that you want to synchronize with. You also can specify the file types that you want to synchronize and the synchronization type.
When you have configured all the options, click over Next button. Then all changes in both folders will be analyzed and showed in the following window:
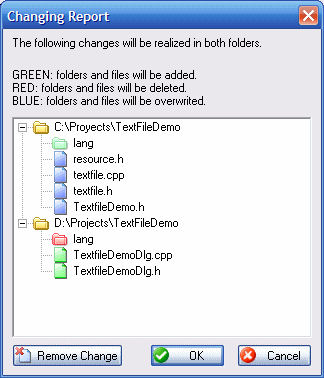
Depending of the changes which will be realized in both folders, the icons of the folders and files will be showed with the following colors:
| · | Green: elements will be added. |
| · | Red: elements will be deleted. |
| · | Blue: elements will be replaced. |
If you don't want to apply an specific change, select the change and click over Remove Change button.
Click over OK button in order to start the synchronization process.
When two files exist in both folders with the same file name, the last write time will be compared to determine which file is newest. However, also it is possible to compare the file version for executable files (.exe, .dll, .ocx, etc.) rather than the last write time (you must check the following option: "Compare file version rather than time for executable files (.exe, .dll, .ocx, etc.)").
Synchronization Types
You can specify the following synchronization types:
| · | Unidirectional, Folder 1 -> Folder 2. If you select this option, the Folder 2 will be modified in order to be equal to Folder 1. The Folder 1 will be kept unchanged. The following changes will be do to Folder 2: |
| · | Add the elements that exist in Folder 1 but not in Folder 2. |
| · | Replace the elements that exist in both folders, but in Folder 1 they are newer than in Folder 2. |
| · | Delete the elements that exist in Folder 2 but not in Folder 1. |
| · | Unidirectional, Folder1 <- Folder2. If you select this option, the Folder 1 will be modified in order to be equal to Folder 2. The Folder 2 will be kept unchanged. The following changes will be do to Folder 1: |
| · | Add the elements that exist in Folder 2 but not in Folder 1. |
| · | Replace the elements that exist in both folders, but in Folder 2 they are newer than in Folder 1. |
| · | Delete the elements that exist in Folder 1 but not in Folder 2. |
| · | Bidirectional, Folder1 <-> Folder2. If you select this option, both folders will be modified in order to be equals. The following changes will be do to both folders: |
| · | Add to Folder 1 the elements that exist in Folder 2 but not in Folder 1. |
| · | Add to Folder 2 the elements that exist in Folder 1 but not in Folder 2. |
| · | Replace in Folder 1 the elements that exist in both folders, but in Folder 2 are newer than in Folder 1. |
| · | Replace in Folder 2 the elements that exist in both folders, but in Folder 1 are newer than in Folder 2. |
| · | Customized. If you select this option, you will may customize the changes to realize to both folders. |
File Types to synchronize
If you want, you can synchronize some file types only. In the Files combo box, you can choose the following options:
| · | All files. This options will synchronize all files and folders. |
| · | Only files which match the filters. If checked, only the files which match the filters specified in Filters field will be synchronized. |
| · | Only files which do not match the filters. If checked, all the files will be synchronized except the files which match the filters specified in Filters field. |
The Filters field must contain each filter separated with a semicolon. The filters can contain the wildcard characters either * (zero or various characters of any type) or ? (a character of any type). For example, to match files with .exe extension or with .dll extension, you must use the following filter: *.exe;*.dll
Profiles
You can save the configuration in profiles, so if an specific configuration is used various times, you can configure a profile and then load that profile each time you want to use that configuration. At the bottom side of the window a combo box exists with the profiles names and three buttons that you lets load, save or delete the profiles, respectively. All configuration is saved in the profile except the Folder 1, which is always selected from the Windows Explorer.


